Recipes

Turkey Pesto Pizza

Well I am a little late to the party with this recipe I originally planned to have it up right after Thanksgiving, except I kind of suck 🙂 and the time just got away from me!  Since it is the middle of January it is safe to say that we have safely survived the holidays.  Unfortunately this means you probably do not have any left over turkey breast waiting in the fridge to be gobbled up anymore.  But hopefully even though the holidays have passed you aren’t too burnt out on turkey because you are going to want to try this pizza recipe; at least one time!  Now since we are assuming you do not have any leftover turkey you can head over to the recipe I posted awhile back for crockpot turkey breast.  If you whip this up you can then come back and make this recipe with the leftovers; well if there are any leftovers after that meal.  😉

If you’re anything like me you get bored easily eating the same thing over and over and I am guilty of wasting perfectly good leftovers because I just can’t bare to eat the same thing again which is why this recipe is good because you can use leftover turkey or even chicken that you have in your fridge.  During the holidays I had all this leftover turkey and I didn’t want any of it to go to waste I wanted to make sure I try something different with the meat to keep my taste buds from getting bored.  This pizza recipe started with me being at the grocery store picking up a few basics when I came across garlic & herb pizza dough in the refrigerator section of my Fresh & Easy.  This was something I hadn’t seen before and it sounded yummy and different, but I wasn’t quite sure how to make a pizza with this dough.  It isn’t a plain crust so not just anything would go with it.  That was when I saw the pesto just below the crust and realized that the mix of pesto and turkey could make for an interesting pizza.  That was how this pizza was quickly born and luckily for me the flavors of the turkey with the pesto and the herb crust was just perfect.

This is a quick and easy dinner or in my case lunch.
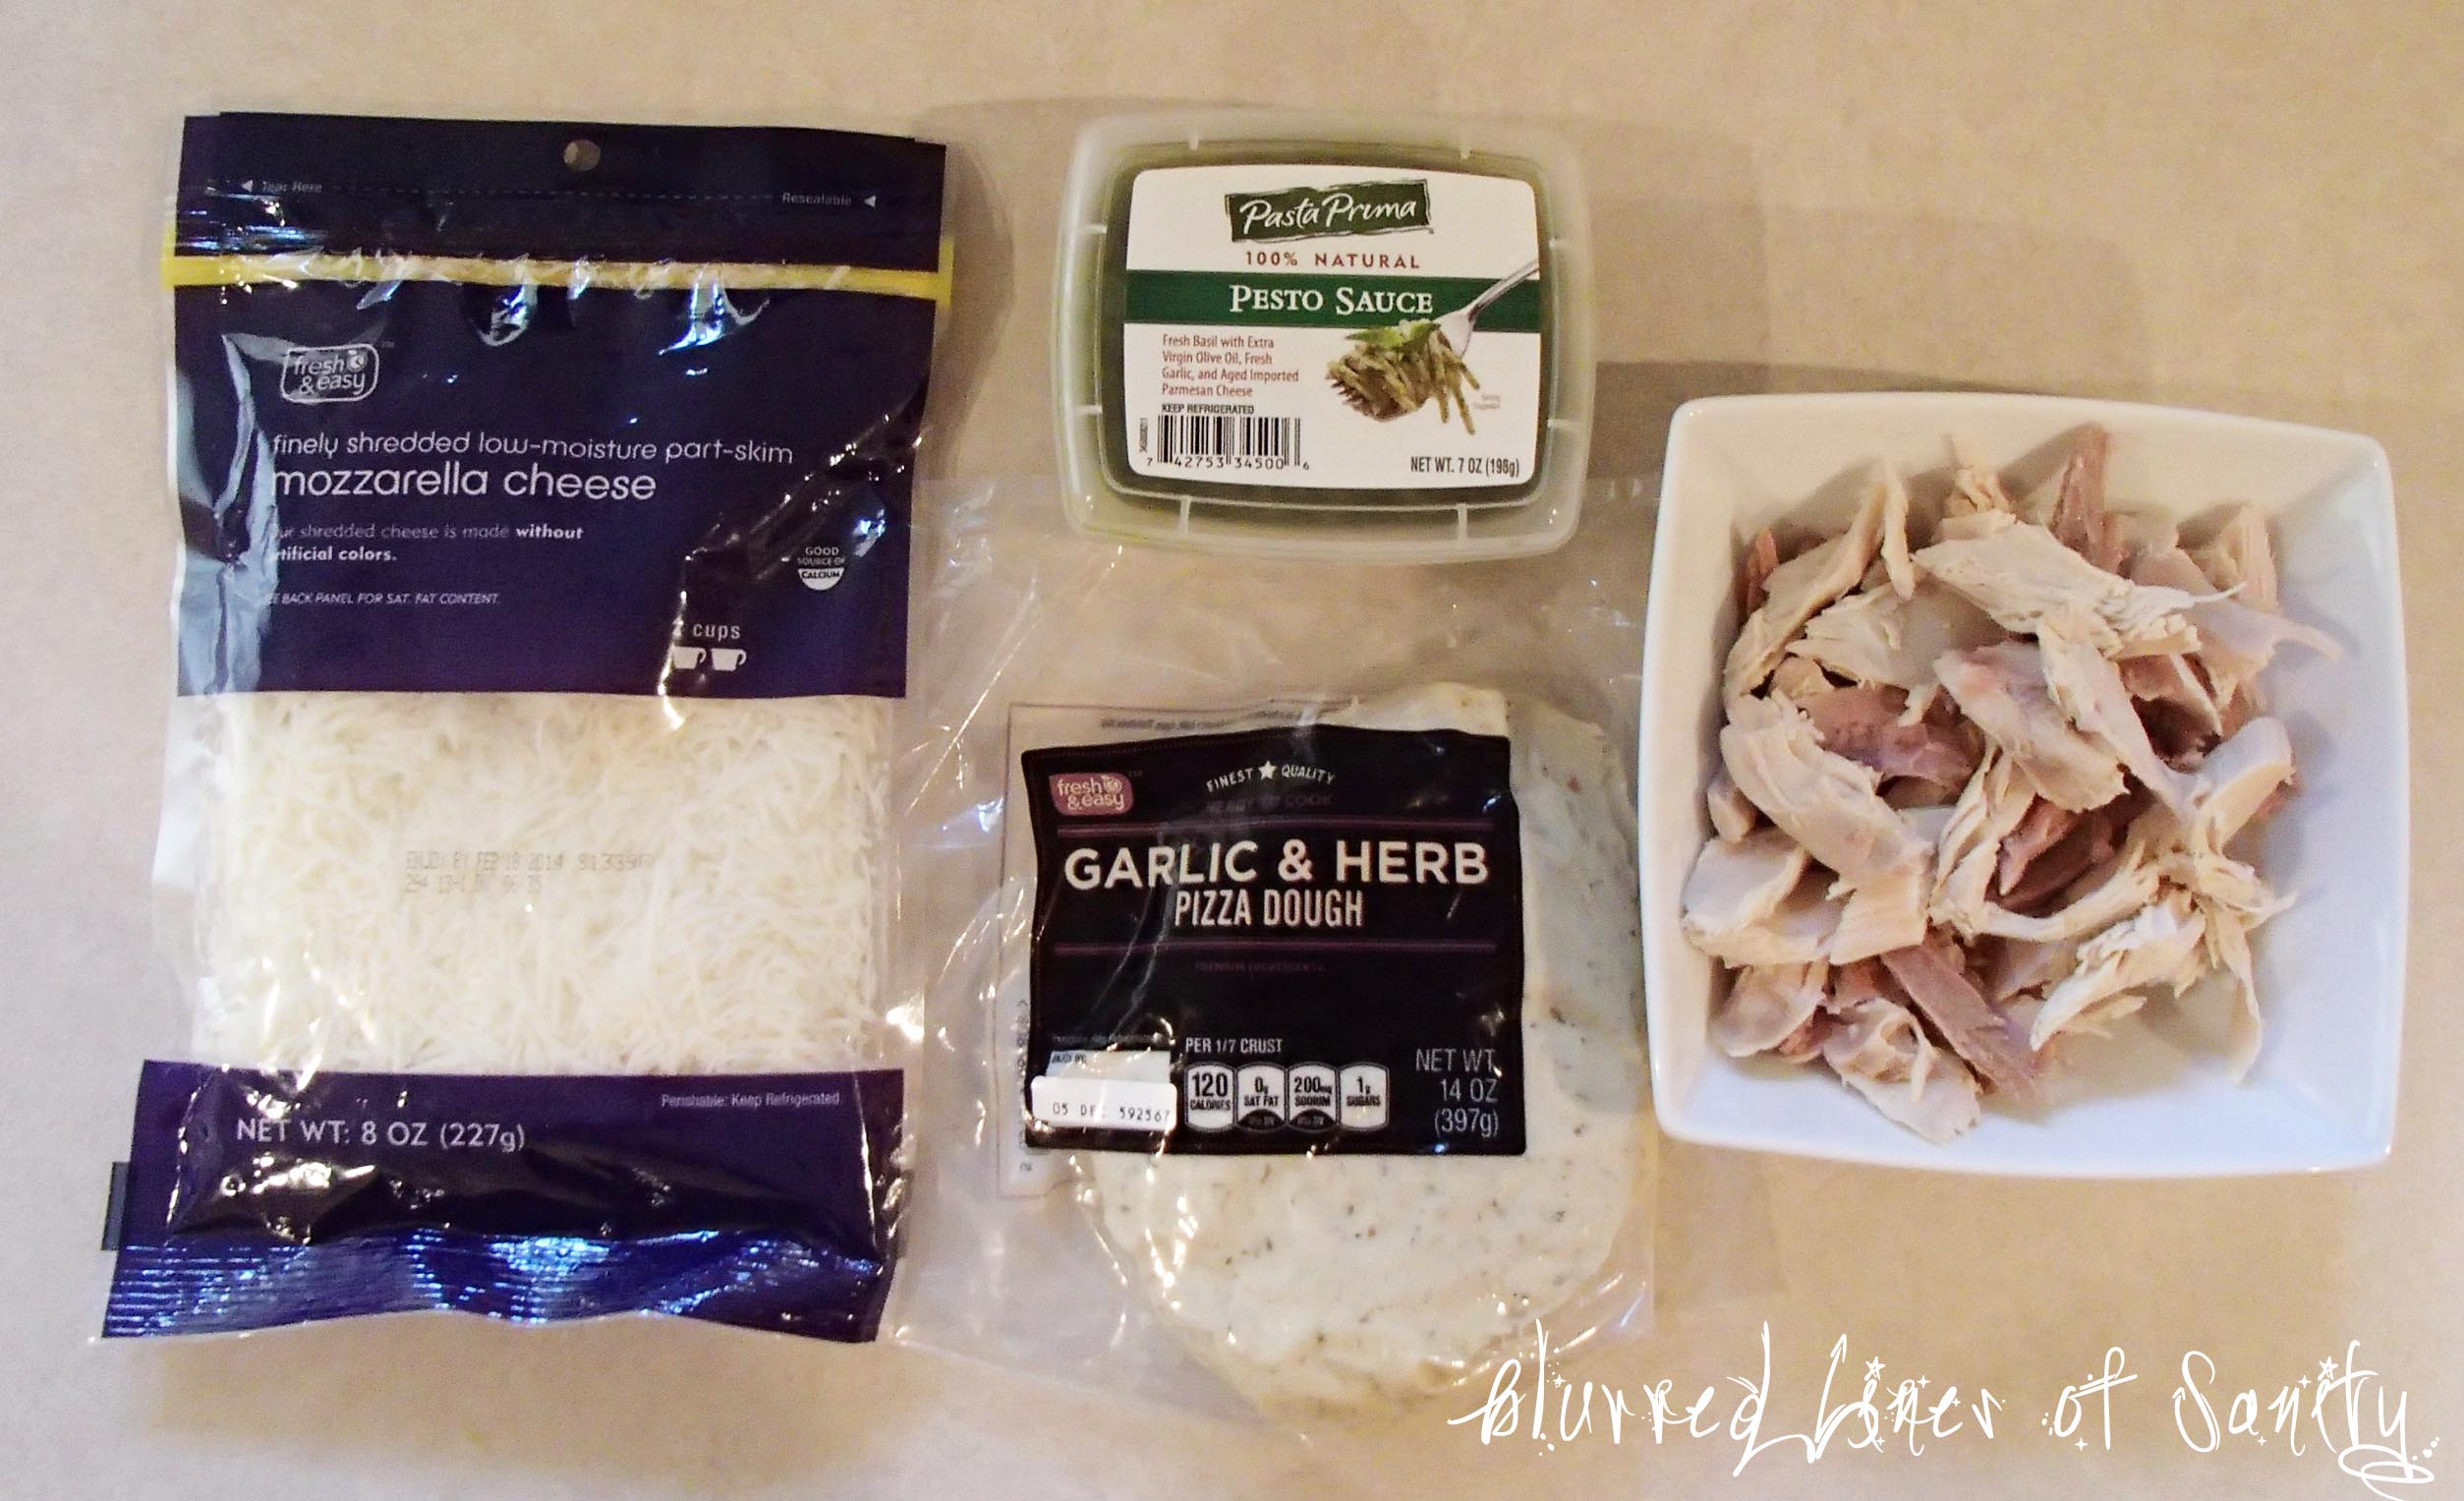
OLYMPUS DIGITAL CAMERA

Ingredients

1 package premade pizza dough (you can use homemade or any pizza dough you love)

1/2 cup to 3/4 cup pesto sauce

1 cup shredded mozzarella cheese

1 cup precooked turkey(chicken); I used both white & dark meat

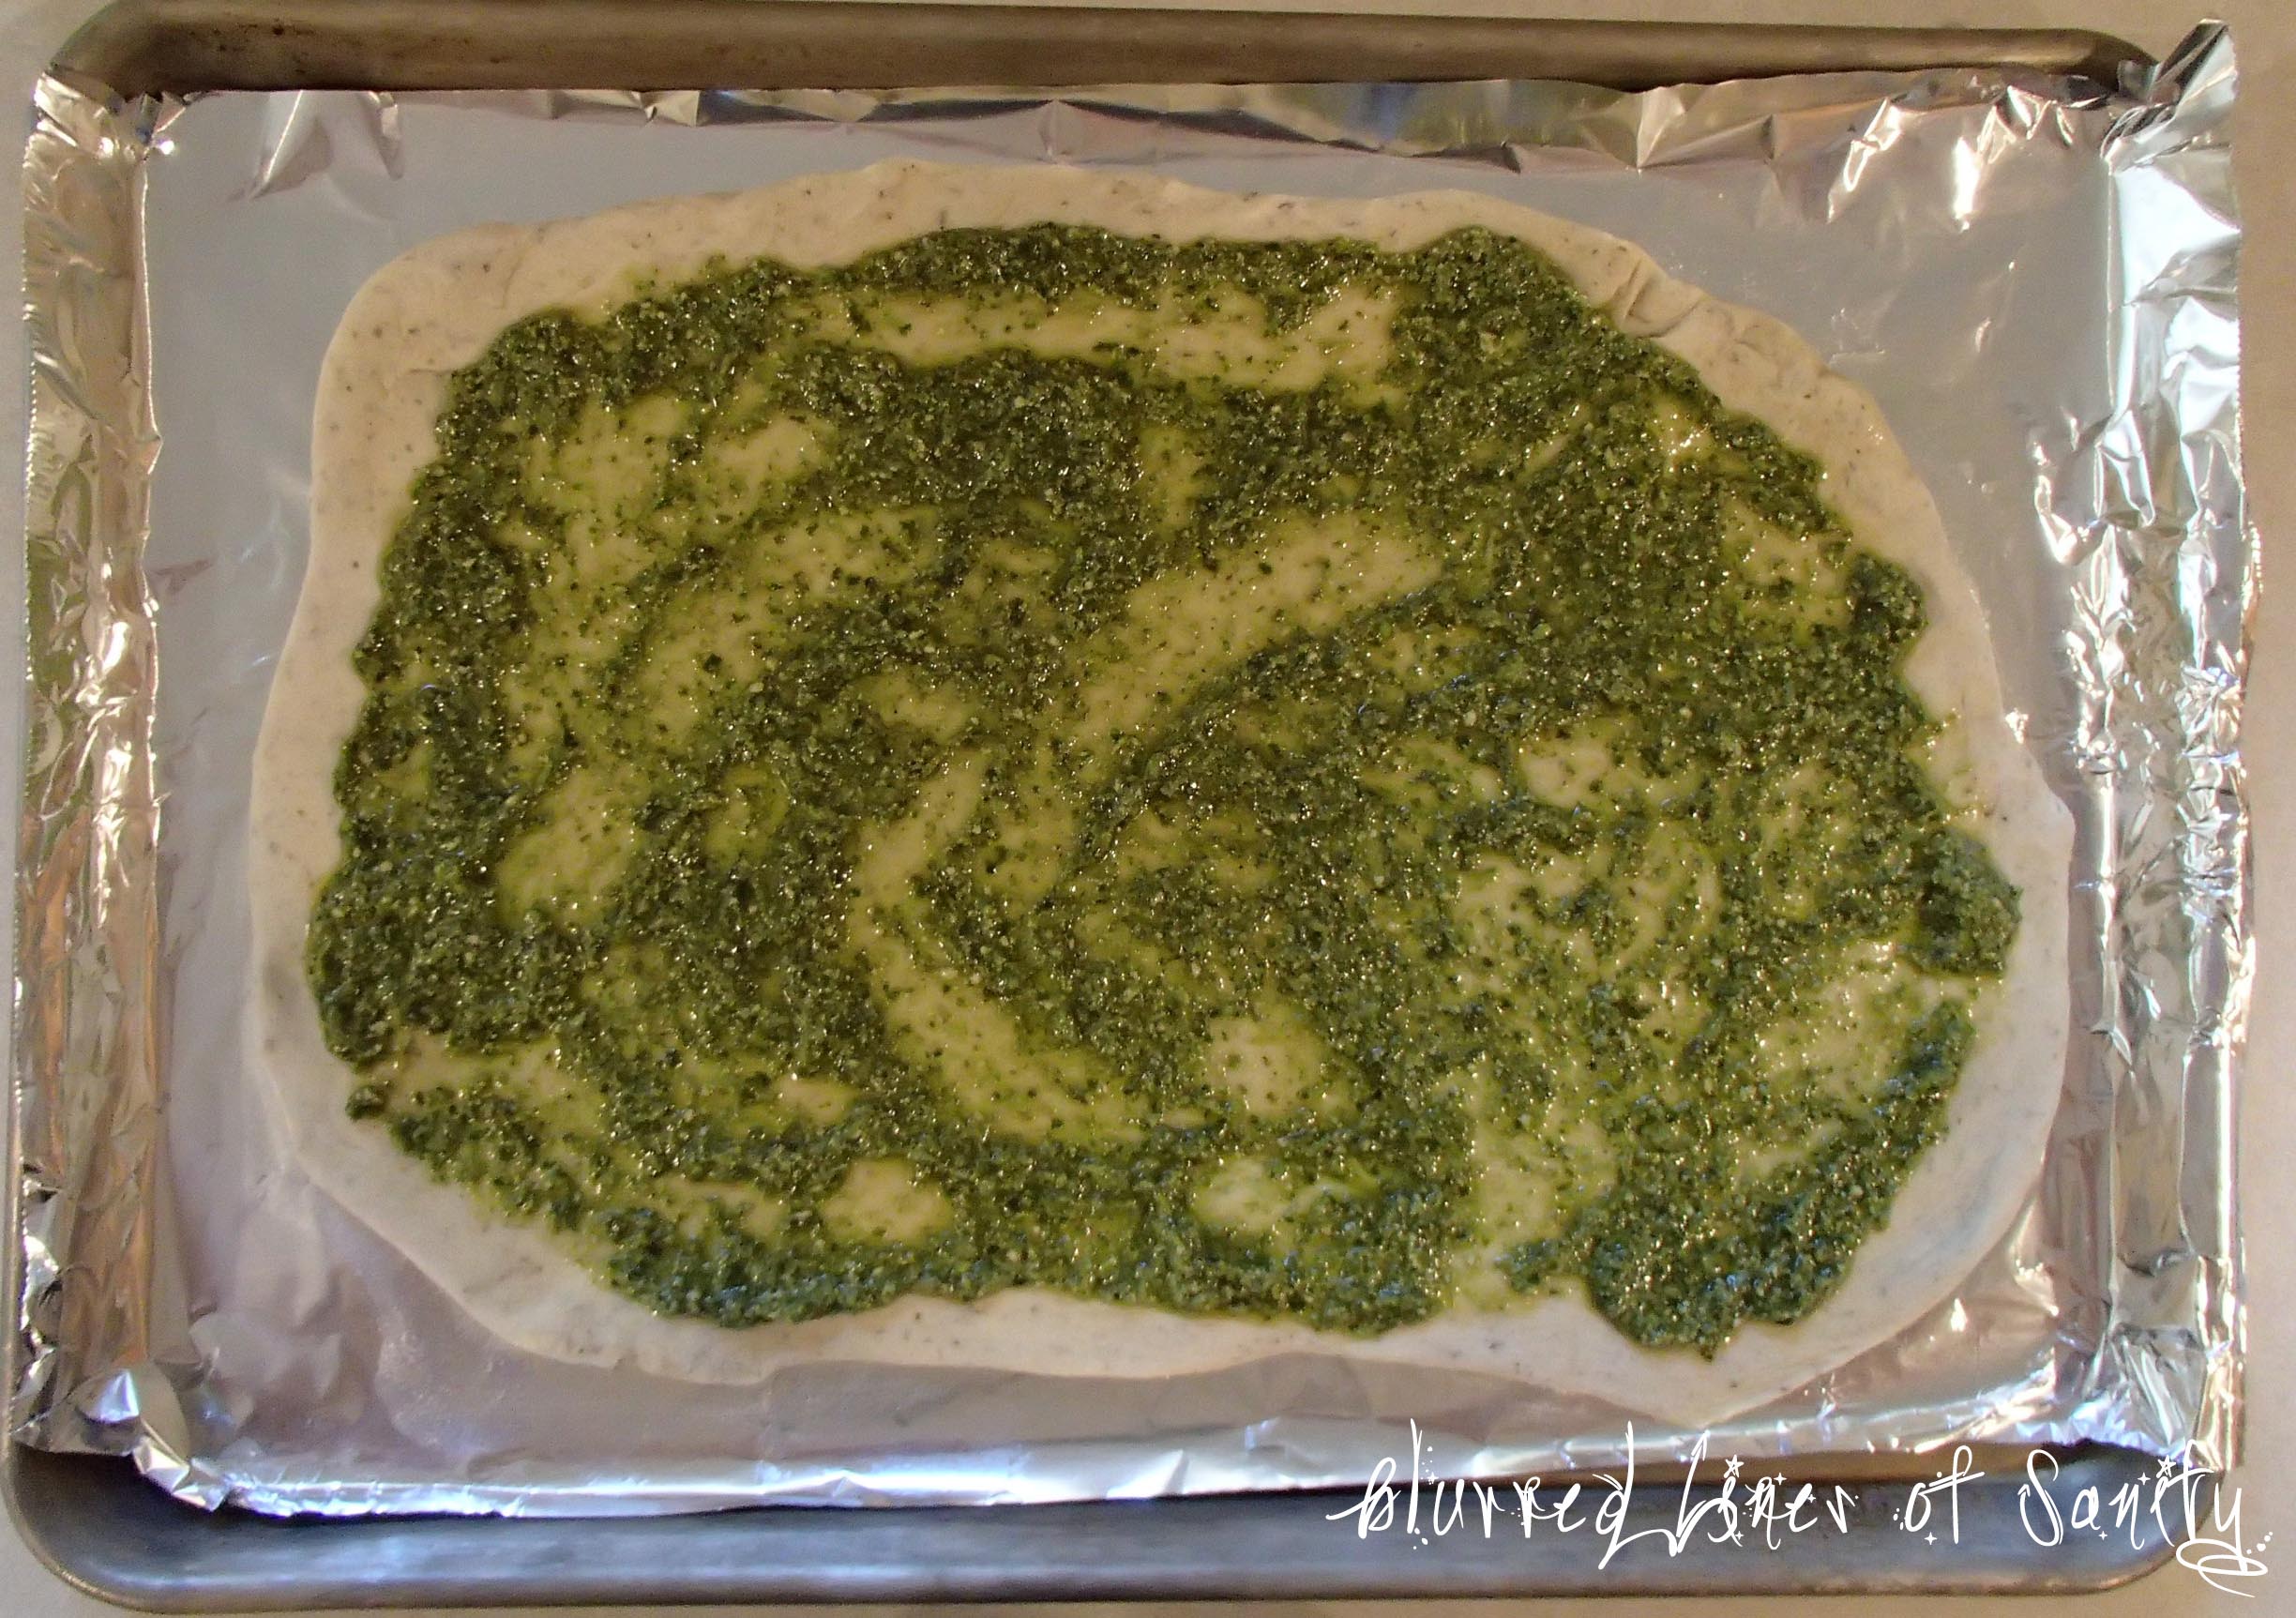
Follow any preparation directions on the pizza dough; for the Fresh & Easy dough you have to leave the dough at room temperature for 30 mins before you can begin.  This dough cooks at 425 degrees so I preheated my oven after I let the dough rest at room temperature.  This way once I assembled the pizza the oven would be ready.

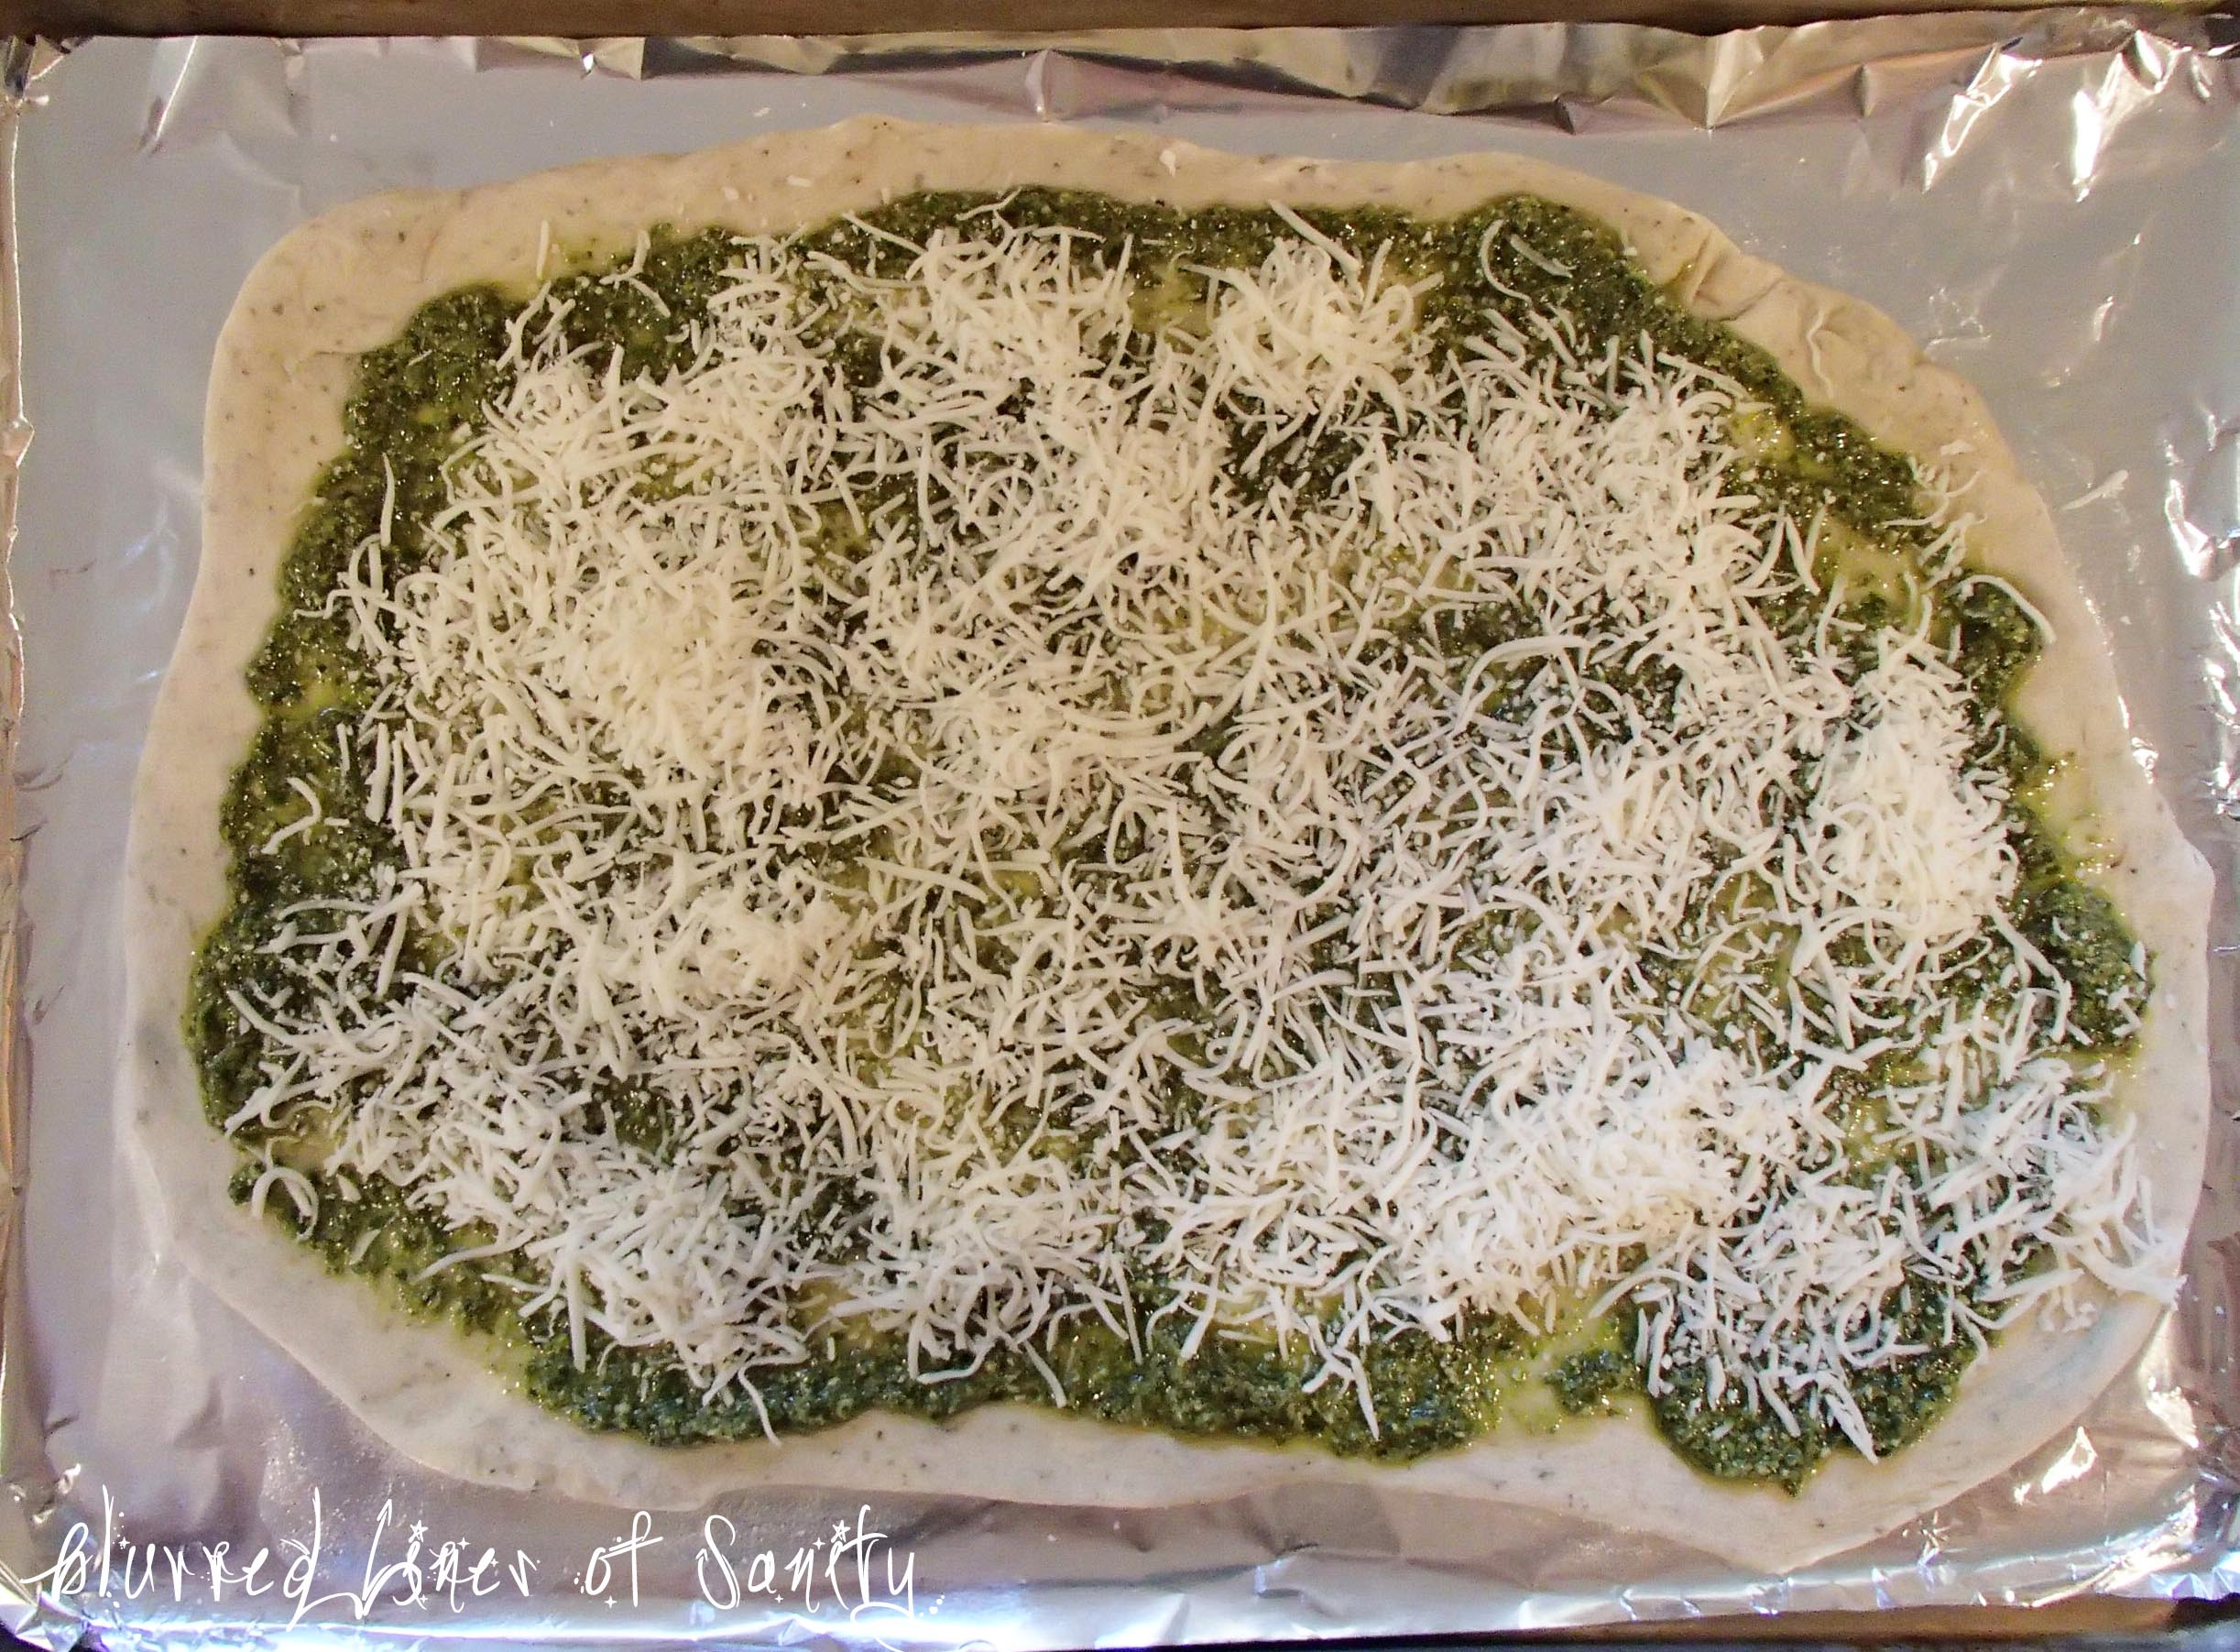
Once your dough has been rolled place 1/2 cup of pesto sauce and spread it out leaving 1/2″ border of exposed dough.  I noticed that 1/2 cup covered only a portion of the dough so I added about 1/4 cup more.  You want it to look like this:

OLYMPUS DIGITAL CAMERA

Once the pesto has been spread out take your shredded cheese and sprinkle it around the dough.

OLYMPUS DIGITAL CAMERA

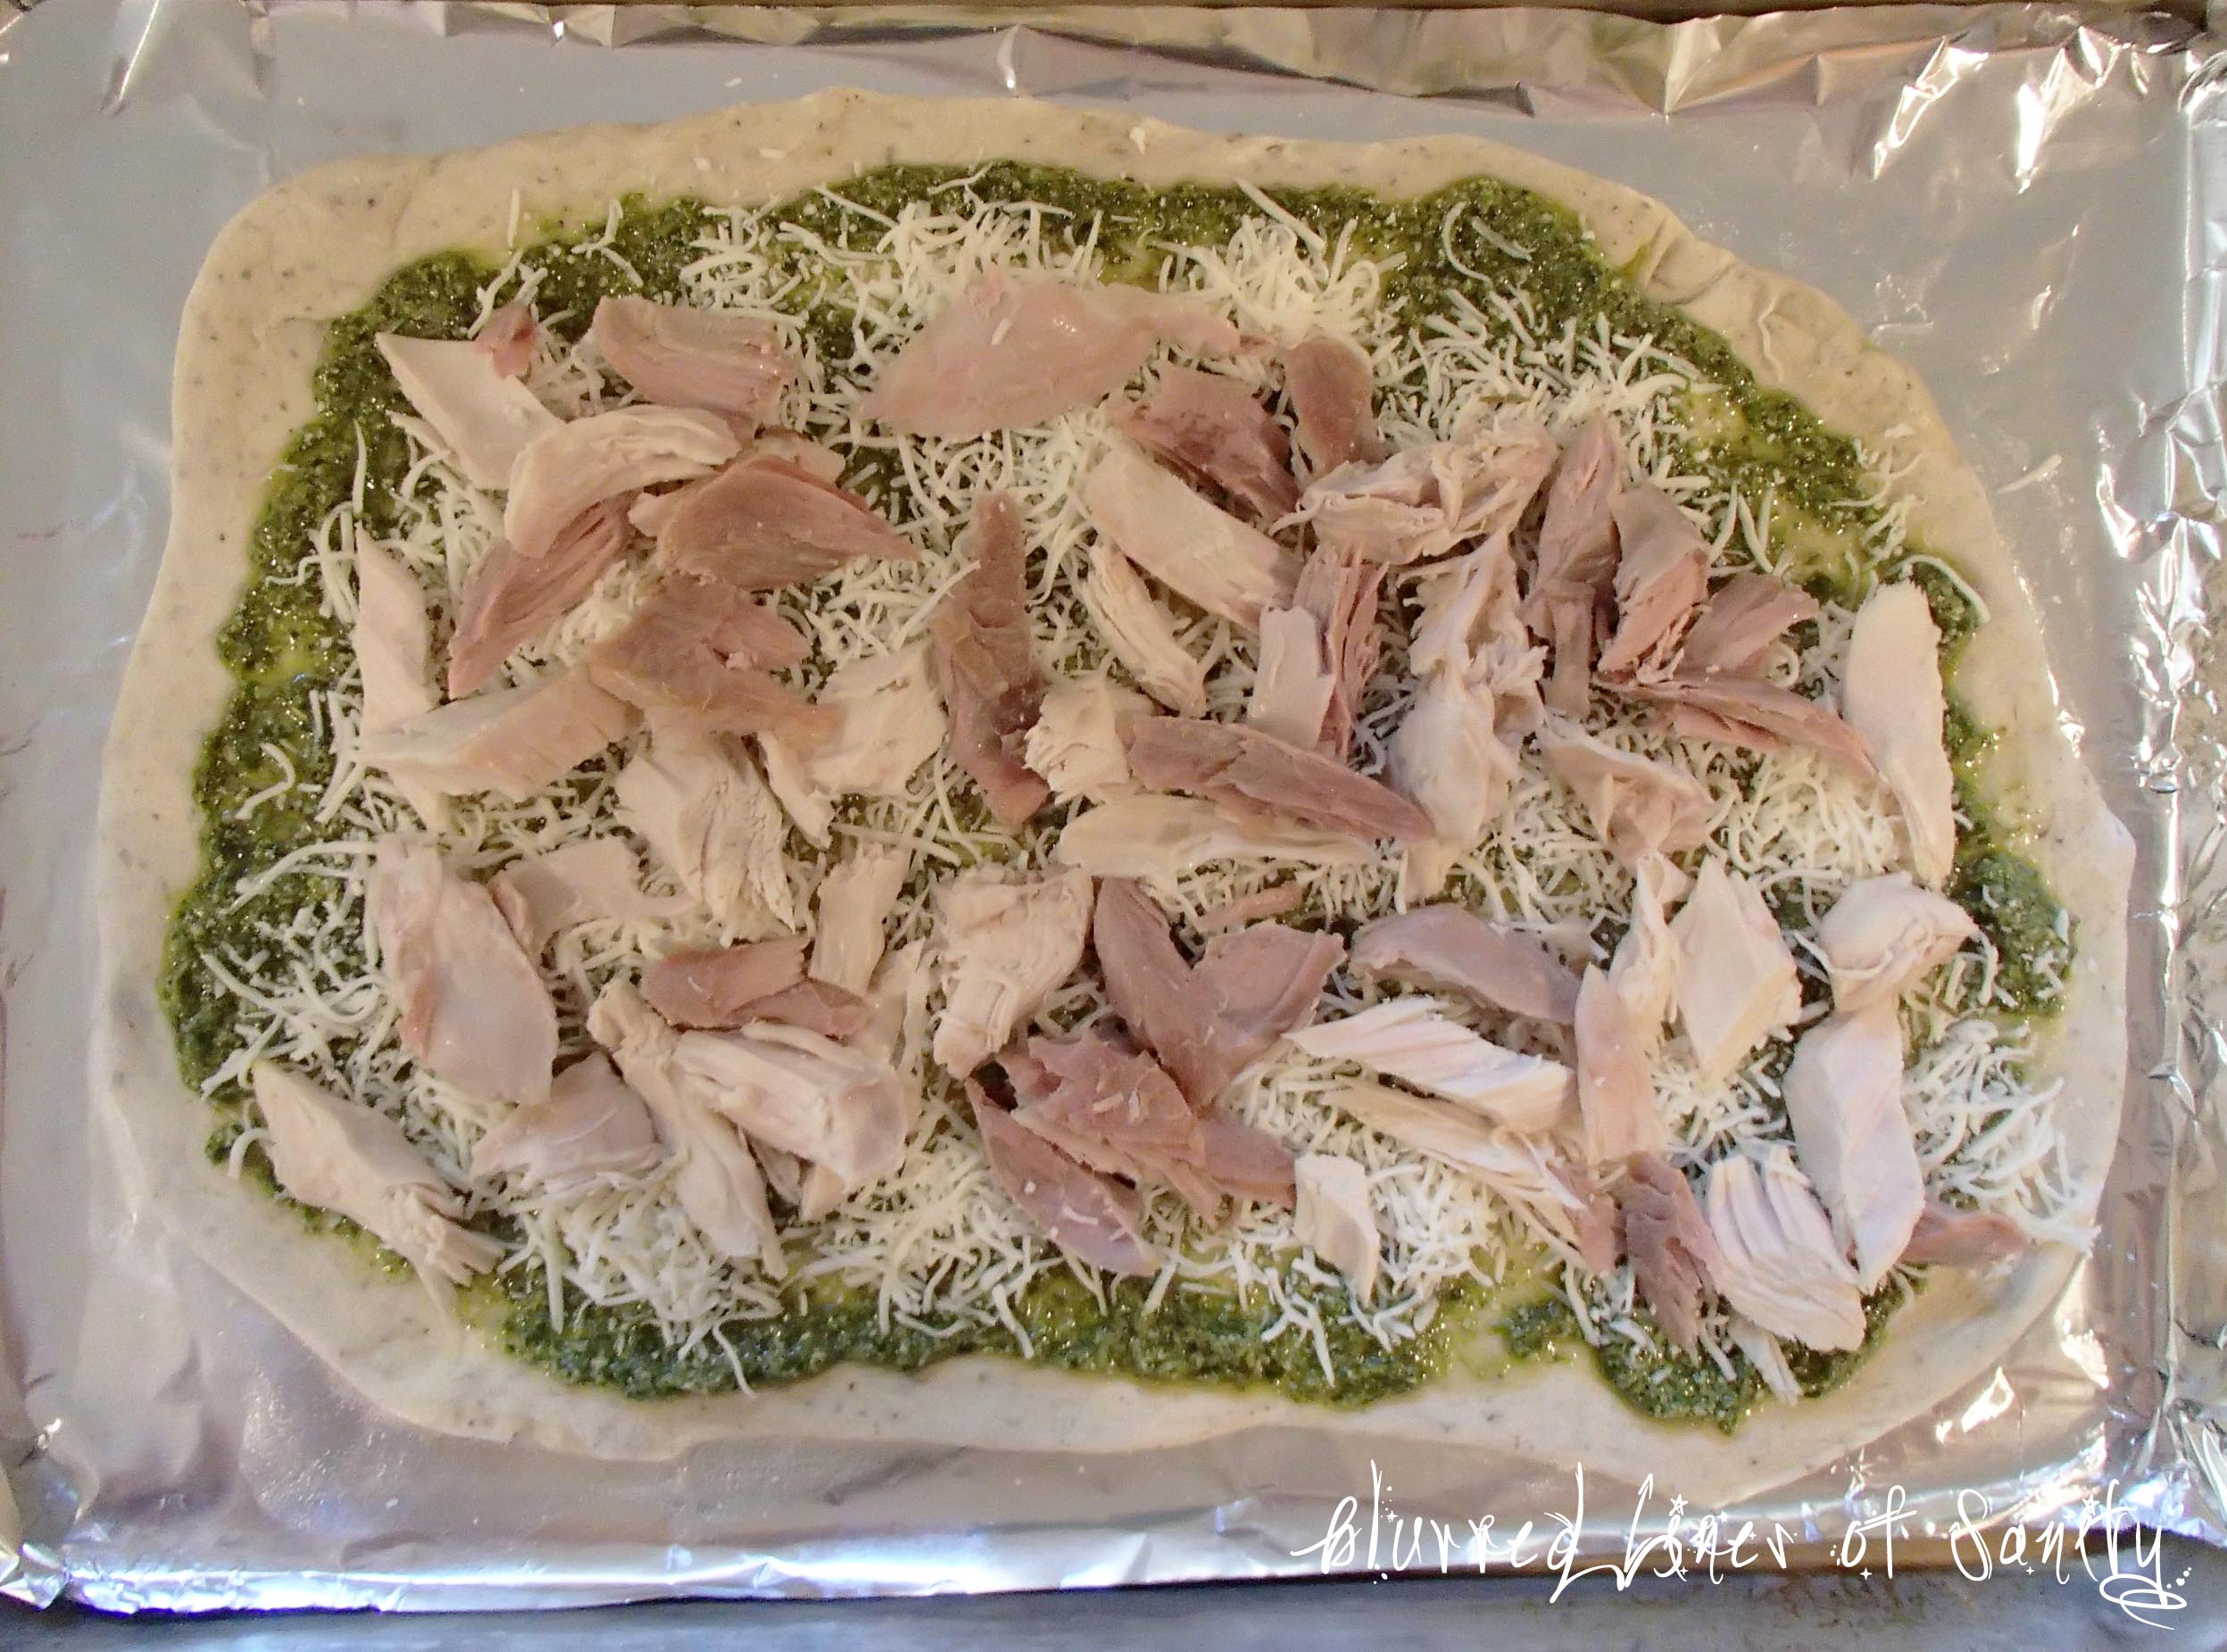
Now you are going to top the pizza with your chunks of white and dark meat.  Feel free to use whichever meat you prefer, I liked a little dark meat mixed in because it brings a different flavor to the dish than just white meat.  The flavor is a lot more pronounced which I think is why you get some people that will only eat white meat.

OLYMPUS DIGITAL CAMERA

You will then placed your prepared pizza into your preheated oven for 18 – 20 mins or until the crust is a nice golden brown and the cheese is bubbly.

OLYMPUS DIGITAL CAMERA

If you give this recipe a try please be sure to come back and leave a comment letting me know how it came out!  For me it was very good the first day and just as good as leftovers even after it had been refrigerated.  At this point I noticed that the pesto was more prominent the next day, I take it  was because it had time to meld with all the other ingredients.

Crockpot Turkey Breast Roast

Have you ever had that craving for roast turkey, but have no motivation to cook a full turkey?  Plus who wants to heat their house up during the summer with an oven?

All Finished! Enjoy!

As you can see the meat just falls apart because its so tender!

Well the answer to those cravings is today’s post!  Today I am sharings a recipe for roast turkey breast that is made in the crockpot.  No need to slave over the oven, you can just set it and forget it.  I also chose this recipe based off of a recent conversation with one of my coworkers about how she doesn’t enjoy cooking, she isn’t sure if it is because she just doesn’t know how or if she really just hates the idea of cooking.  My advice to her was break out a crockpot and try this recipe, it is easy, short, and oh so delicious.  I told her that it would be good for her to give the set it and forget it portion of cooking a try to get her toes wet.

Gather up the ingredients and your trusty crockpot and give this a try!

Ingredients:

1 boneless or bone in defrosted turkey breast (I use Honeysuckle Boneless w/dark meat)

1 medium white onion

1 14.5 oz can of Chicken Broth (I use low sodium Swanson)

2-3 lbs red potatoes

Seasonings: granulated garlic, thyme, dill, salt & pepper

First let’s talk a little about the turkey breast.  You can find these frozen turkey breast normally right next to the full sized turkeys in the freezer section of your grocery store, they come in varying weights but most are 4-6 lbs.

Turkey Breast

©Blurred Lines

I normally buy the Honesuckle White boneless breast with white and dark meat, this is because it is just what I seem to find in the stores near me and it runs about $8 per roast; which fits in my budget for meats.  It will easily server 4 without too many leftovers.  Just depends on your guests appetites.  I will go ahead and buy a couple at a time and keep them in my freezer for that go to meal or that random craving for Thanksgiving dinner in July.  Because these breasts are frozen you do need to do some prep the day before you want to cook your crockpot meal because we need to defrost the breast before cooking.  Now I will admit I have done this same dish with a partially frozen breast and it came out just fine; actually I am pretty sure that my breast this time was a little bit frozen.  While it is not normally suggested to use a frozen roast I am here to say I survived, but please use discretion when cooking poultry from a frozen state.

Now that you have defrosted your breast the next morning you are ready to get going.  The first thing you need to do is cut your onion in half and then those halves into 4 wedges.  Break the layers a part and put them at the bottom of the crockpot.

Your turkey breast and potatoes will rest on top of them.  Next up you want to take your breast out of its packaging, at this point you will notice that there is netting surrounding the breast.  Feel free to leave it on or remove it, for this time I decided to remove the netting.

What it looks like without the netting

©Blurred Lines

  I always found it annoying trying to take the netting off the extremely hot roast when I am ready to serve so I decided to be a rebel and see what happens.  (Well the dramatic pause moment is that nothing happened it retained its shape and came right of the pot in one piece.)  So I suggest you do what feels right to you, both ways get the same results for me.  Once you have made your choice to remove or not remove the netting give the breast a quick rinse and pat dry.  Place the roast skin side up in your crockpot.  Now you need to season the breast with the above mentioned spices.  I do not have measurements because I tend to go by sight & smell versus exact measurements.  If I had to guess I would say I used about 1 -2 tablespoons of each one.  Also if you don’t like garlic use onion powder or none at all.  Feel free to add sage or even rosemary to the top anything goes at this point.

Once you have seasoned the roast to your liking drop your red potatoes next to or all around the roast however they fit best.  For me they are side by side because my crockpot is oval not round and I just have more room.  I then sprinkle additional salt and pepper over the potatoes and then pour the chicken broth around the sides.  Doing my best to not wash the seasonings off of the roast or potatoes.

Now all you need to do is place the lid on your pot set the crockpot to low and walk away for 6-7 hrs or until the internal temperature is 179 degrees.  Avoid opening the lid for the first 5 hrs, because the crockpot will have to regain the loss of heat and that can cause the food to take longer to cook.  If your crockpot tends to cook on the high side this could be done closer to 5 hrs.  I know mine runs high and it would have been done at 6 but I let it cook for 7.  It still maintained all the flavors and was not dried out but it was running closer to 206 degrees internally instead of the recommended temp of 179.

Once it is done cooking remove it from the crockpot and allow it to rest for 2-3 minutes then slice and enjoy!  When you give this a try please come back and let me know how it turned out, if you made any changes, or if you know of tip/trick that enhances things!

Mini Cheesy Meatloaf

While trying to decide what I wanted to cook for the week I got this craving for meatloaf.  I know it seems like a weird craving but for some reason it just sounded so good.  I remember my parents making a cheese stuffed meatloaf as a kid, we didn’t get it all the time but it showed up on the dinner table often.  It was quick and cooked in the microwave; we had a thing for meals cooked in the microwave so much so we have a huge recipe box full of microwave only recipes, who knows maybe I’ll but one of those out in the future.  Now I have had some good meatloaf and the bad, I think there is a fine line between something delicious and just a block of meat; and unfortunately it doesn’t take much to cross into the bad.  I think this is why meatloaf gets such a bad rap often times it is hard and flavorless, I have had many people tell me how gross meatloaf is and then they describe that cafeteria meatloaf from elementary school.  I am sorry there was no way to make that taste good.  So when I think about what I was served as a kid it was always full of flavor and stuffed with cheese how can you go wrong with that.  Now honestly I can’t tell you the last time I actually had meatloaf but I had to do something about this craving so I came up with this:

©Blurred Lines

©Blurred Lines

Since I did not have my parent’s recipe on hand and I didn’t really know where to start but I did know what I wanted in it, simple flavors and cheese.  I did a little research on the good old internet and crafted my own recipe.  I took bits and pieces from recipes online and my knowledge of how my parent’s always whipped it up or guesses on how they whipped it up.  The biggest decision I made was to make it in small individual loaves versus the large loaf that most people remember being served at the dinner table.  Next I wanted to have a sweet & salty type sauce on top to help with moisture and below you can see the whole recipe.  Don’t forget to make adjustments as you see fit, a little more spices here or less cheese (but who wants less cheese) cooking is fun and should be enjoyed so use what you love!

Mini Cheesy Meatloaves

1 lb ground beef (or any other ground meat you prefer)

1-2 eggs lightly beaten (I used two medium eggs adjust for the size you have on hand)

1 cup shredded cheddar cheese

1/2 medium yellow onion diced

1 tbsp dried orageno

1 tbsp dried parsley

1 tsp granulated garlic or minced garlic

1 tbsp Worcestershire sauce

1 cup plain breadcrumbs (you may need more or less depending on how wet your meat is, I used an extra 1/4 cup)

Salt & Pepper

Ingredients for the Sauce

1/4 – 1/2 cup Ketchup

1 tbsp Horseradish Mustard (next time I will up this to 2 tbsp)

1 tbsp Worcestershire sauce

1 tbsp brown sugar

Heat oven to 425° F and then place your oven rack in the middle of the oven.  Line a rimmed baking sheet with tinfoil and spray with nonstick cooking spray.

While the oven preheats get a large bowl and put in your ground beef, spices, Worcestershire sauce, lightly beaten eggs and breadcrumbs.  The next part is messy but the only way to make meatloaf, remove any jewelry and then get your hands in there and mix it all up.  At this point if it feels really wet add additional breadcrumbs just to soak up the extra liquid and help keep things together.  Once you have it all mixed up throw in your onion & shredded cheese and give it another good mix.  Feel free to add everything all at once then mix it up, I did in two mixes because honestly I forgot those two ingredients on the other side of the counter and I decided to write this exactly how I did it not that it matters but you never know.  The joys of cooking, you can improvise as you go through it is never exact and that is half the fun.  This is how it should look once mixed up, meat doesn’t look dry and everything is fully incorporated.

©Blurred Lines

©Blurred Lines

Once everything is mixed up you are going to form 4 to 6 loaves with your hands, and place on your greased cookie sheet.  It all depends on how big you make them, I only made 4 this time.  I got two on the larger size and two smaller ones, which was perfect for lunch the next day.

©Blurred Lines

©Blurred Lines

After you have formed your loaves and given your hands a good scrubbing it is time to make the sauce.  In a small bowl take your ketchup, mustard, spices and sugar and give it a good stir.  Once it is all mixed up spoon the mixture over each of the loaves giving them a nice top coat.  The sugar in the sauce will begin to caramelize and become almost like barbeque sauce.

©Blurred Lines

©Blurred Lines

By time you have sauced the loaves your oven should be nice and hot.  Go ahead and place them in middle of your oven for 25 – 30 mins or until the center is no longer pink.  At 25 mins I pulled mine out and as you can kind of see below I cut into it to make sure that it was cooked through and it was perfect.  Depending on how the size and thickness you may have to adjust the cooking time.

©Blurred Lines

©Blurred Lines

Once you remove them from the oven let them sit for 5 mins to rest before diving into your yummy dinner!  Just look at all the melted cheese mixing in the with sauce, yum!  I served mine with asparagus that was tossed with garlic salt and parmesan cheese and red potatoes that I cooked in the microwave and topped with butter, salt & pepper.

I really enjoyed this dish, it has a nice texture not hard like some meatloaves can get if they are over cooked, I think the small loaves help with this.  The nice thing about the onions is that they soften up and add moisture to the loaf which really helps keep the texture soft and more like a really good hamburger.  I ended up bringing the leftovers to work so my mother and I could enjoy them and they were just as good the next day.

I would love to hear how yours turns out or if you made any changes and how they worked, just leave me a comment!

Crockpot BBQ Ribs

I came across this idea of cooking ribs in the crockpot on of course Pinterst.  The new mecca for food, crafts, clothes you wish you had and your dream wedding. It will suck you in with all the delicious food and normally I just pin these foods and say I am going to make them and rarely go back.  But seeing this idea I just knew I had to make them. So I went out and if you know me personally you know that I hate grocery shopping so the fact that I decided to go just to buy ribs is saying something! The pin I came across lead me here and I used her recipe as inspiration to create the ribs to my liking.

Close Up - Just out

BBQ Crockpot Ribs

2-3 lbs Pork Loin Back Ribs

1 1/2 – 2 cups BBQ Sauce – use your favorite store bought or homemade sauce

Chili Powder

Sage

Onion Powder

Garlic Salt

Pepper

Garlic Powder

**Now I didn’t put measurements of the spices because truthfully I am a firm believer of trust your taste buds and eyes which means apply to your liking, some people like more chili powder some like less. I eyeballed it to my tastes and I would say I used 1 tablespoon on each slab of ribs of everything except the garlic salt, this I would say is only 1/2 tablespoon per slab.**

The night before gather up your spices and unpackage your ribs; leave the membrane on to help keep things together. (the long slow cooking will make this tender and perfectly fine to eat) On a large cookie sheet lined with tin foil apply the seasonings to your liking on both sides, be sure to rub it the seasonings into the meat; you want everything nicely covered. Once you have seasoned the ribs to your liking cover your tray with tin foil and refrigerate until you are ready to put them in the slow cooker.

Seasoned Ribs

The next morning get your slow cooker out and unwrap your ribs. For this recipe I am using a 6 qt oval crockpot. You are going to then place you ribs with the meat against the stoneware standing on end thickest part on the bottom (mine where pretty much the same thickness so I just stood them up with the meat against the outside). There will be a hole in the middle of the crockpot this is ok. Also it is ok if they over lap a little but try to keep them all against the stoneware as much as possible. Once you have them in the crockpot take your favorite BBQ sauce and pour the sauce over the top of the ribs to it runs down the back and front of each slab. It is ok if not every section of the meat is covered.  Just make sure you have a nice ring of sauce across the rib tips that are pointing up.  While things heat up the sauce will melt down and through the ribs making everything delicious. You will also notice that towards the end of the cooking time the sauce will fill the empty space in the center and be bubbling away.

In Crockpot

At this point you are ready to go, just put the lid on and set to low and cook for 6-8 hrs. I first checked on them at about 6 hrs because my crockpot runs hot and decided to let them go to 7 hrs, which turned out perfect. You should see that the meat is pulling away from the bones especially on the ends of the rack.  I pretty much use this tip no matter how I cook ribs.

Just out

Once your ribs have cooked up all nice and tender remove them gently from the crockpot with tongs, mine were so tender that they did come out in pieces. Once out of the crockpot baste them with a little extra sauce and serve.

I dished mine up with a side of oven roasted asparagus; which is one of my go to side dishes because it is so simple. Place asparagus on a tin foil lined baking sheet drizzle it with olive oil and season with garlic salt, onion powder and dill. (adjust seasonings to your favorite flavors) Put the pan under the broiler on high for 3 -5 mins, watch carefully to not over cook.  The asparagus should be bright green and still a bit firm which gives it a nice bite.

I hope you take the chance and give this recipe a try, don’t be scared to use your favorite spice rub that you picked up at your local grocery store or if you have a tried and true spice rub mix that you make break that out for these lovely crockpot ribs. Cooking should be fun and recipes are just guidelines.